Table of Contents
- Introduction
- Why Choose LAMP Stack for Your Linux Distribution?
- Step 1: Check System Configuration
- Step 2: Verify Configured Repositories
- Step 3: Installing apache (httpd) on the server.
- Step 4: Configure Firewalld for HTTP and HTTPS
- Step 5: (Optional) Install mod_ssl for HTTPS Access
- Step 6: Test the Default Apache Page in Browser and Terminal
- Step 7: Install and Configure MySQL or MariaDB Server
- Step 8: Installing PHP.
Introduction
In this guide, we will install LAMP Stack on CentOS/RHEL 9, a powerful combination of open-source software that includes the Linux operating system, Apache web server, MySQL (or MariaDB), and PHP. This stack is commonly used to host websites and web applications efficiently. This guide is applicable not only to CentOS and RHEL but also to Rocky Linux, Alma Linux, making it versatile for various environments.
While MySQL is the traditional database management system used in this software stack, many Linux distributions opt for MariaDB as a drop-in replacement due to its enhanced performance and features.

For our demonstration, we will be using a Rocky Linux 8.6 server to install and configure the LAMP stack, specifically focusing on how to install LAMP stack on CentOS/RHEL 9, with MariaDB as the chosen database management system.
Rocky Linux is an open-source enterprise operating system that is designed to be 100% bug-for-bug compatible with Red Hat Enterprise Linux (RHEL) and is actively developed by the community.
Why Choose LAMP Stack for Your Linux Distribution?
The LAMP stack offers numerous advantages for web development, making it a popular choice among developers and system administrators. By combining the Linux operating system, Apache web server, MySQL (or MariaDB), and PHP, the LAMP stack provides a robust, flexible, and scalable environment for hosting websites and web applications. When you install LAMP stack on CentOS/RHEL 9, you unlock these benefits even more effectively. Here are some key advantages of using the LAMP stack:
- Open Source: All components of the LAMP stack are open-source, which means they are free to use, modify, and distribute. This reduces costs and allows for greater customization.
- Community Support: With a large user base, the LAMP stack benefits from extensive community support, documentation, and resources, making it easier to troubleshoot issues and find solutions.
- Flexibility and Scalability: The LAMP stack can be easily scaled to meet the growing demands of web applications, allowing developers to add more resources as needed.
- Security: Each component of the LAMP stack has built-in security features, and being open-source allows for regular updates and patches from the community to address vulnerabilities.
- Compatibility: The LAMP stack is compatible with various Linux distributions, including CentOS, RHEL, and Rocky Linux, making it a versatile choice for developers working in different environments.
By choosing the LAMP stack for your Linux distribution, you can leverage these advantages to create powerful, efficient, and secure web applications.
Prerequisites to Install LAMP Stack on CentOS/RHEL 9
Before you install the LAMP stack on CentOS/RHEL, Rocky Linux, or AlmaLinux 8.x, make sure you have:
- Linux Server: Running CentOS, RHEL, Rocky Linux, or AlmaLinux 8.x 9.x.
- Root/Sudo Access: Required for installation and configuration.
- Internet Connection: To download necessary packages.
- Firewall Ready: Configure to allow HTTP (80) and HTTPS (443) traffic.
- Command Line Basics: Familiarity with terminal commands.
- Optional Domain: For hosting a website.
The following step-by-step guide will assist you in installing and configuring the LAMP stack on CentOS/RHEL, Rocky Linux, and AlmaLinux 8.x and 9.x. This guide is specifically designed to help you install LAMP stack on CentOS/RHEL 9, as well as for all versions of CentOS, RHEL, Rocky Linux, and AlmaLinux 8.x and 9.x.
Step 1: Check System Configuration
Run the following command to find your system’s hostname, currently running OS version, and the configured IP on the primary interface:
[root@web ~]# ip -4 -br addr show enp0s3
enp0s3           UP             192.168.218.77/24
[root@web ~]#
[root@web ~]# hostnamectl | grep -Ei "Operating|hostname"
   Static hostname: web.techarticles.in
  Operating System: Rocky Linux 8.6 (Green Obsidian)
[root@web ~]#
Note that your network interface may differ. Use the command ip -4 -br addr show to identify your specific network interface.
Step 2: Verify Configured Repositories
[root@web ~]# yum repolist
repo id                                            repo name
appstream                                          Rocky Linux 8 - AppStream
baseos                                             Rocky Linux 8 - BaseOS
extras                                             Rocky Linux 8 - Extras
Please Note: Rocky Linux comes with the EPEL repository enabled by default. If you’re using a different distribution, enable the EPEL repository to install the LAMP stack. For organizational LAMP configurations, ensure that the default repository is active or verify internally, especially when setting up on a freshly installed OS
For more information on configuring the EPEL repository, visit: EPEL Repository Configuration
Step 3: Installing apache (httpd) on the server.
To install the Apache server, execute the following command:
dnf install httpd -y
Example:
[root@web ~]#  dnf install httpd -y

Last metadata expiration check: 0:01:57 ago on Mon 03 Apr 2023 05:53:33 AM EDT.
Dependencies resolved.
======================================================================================================================
 Package                   Architecture   Version                                             Repository         Size
======================================================================================================================
Installing:
 httpd                     x86_64         2.4.37-51.module+el8.7.0+1155+5163394a.1            appstream         1.4 M
Installing dependencies:
 apr                       x86_64         1.6.3-12.el8                                        appstream         128 k
 apr-util                  x86_64         1.6.1-6.el8.1                                       appstream         104 k
 httpd-filesystem          noarch         2.4.37-51.module+el8.7.0+1155+5163394a.1            appstream          41 k
 httpd-tools               x86_64         2.4.37-51.module+el8.7.0+1155+5163394a.1            appstream         109 k
 mod_http2                 x86_64         1.15.7-5.module+el8.6.0+823+f143cee1                appstream         153 k
 rocky-logos-httpd         noarch         86.3-1.el8                                          baseos             24 k
Installing weak dependencies:
 apr-util-bdb              x86_64         1.6.1-6.el8.1                                       appstream          23 k
 apr-util-openssl          x86_64         1.6.1-6.el8.1                                       appstream          26 k

Transaction Summary
======================================================================================================================
Install  9 Packages

[Output Altered...]

Installed:
  apr-1.6.3-12.el8.x86_64
  apr-util-1.6.1-6.el8.1.x86_64
  apr-util-bdb-1.6.1-6.el8.1.x86_64
  apr-util-openssl-1.6.1-6.el8.1.x86_64
  httpd-2.4.37-51.module+el8.7.0+1155+5163394a.1.x86_64
  httpd-filesystem-2.4.37-51.module+el8.7.0+1155+5163394a.1.noarch
  httpd-tools-2.4.37-51.module+el8.7.0+1155+5163394a.1.x86_64
  mod_http2-1.15.7-5.module+el8.6.0+823+f143cee1.x86_64
  rocky-logos-httpd-86.3-1.el8.noarch

Complete!
Use below commands to Start httpd service and enable it to start automatically after every reboot and check the status.
[root@web ~]# systemctl start httpd

[root@web ~]# systemctl enable httpd

Created symlink /etc/systemd/system/multi-user.target.wants/httpd.service → /usr/lib/systemd/system/httpd.service.
[root@web ~]#
[root@web ~]# systemctl status httpd

● httpd.service - The Apache HTTP Server
   Loaded: loaded (/usr/lib/systemd/system/httpd.service; enabled; vendor preset: disabled)
   Active: active (running) since Mon 2023-04-03 05:59:22 EDT; 48s ago
     Docs: man:httpd.service(8)
 Main PID: 2387 (httpd)
   Status: "Running, listening on: port 80"
Step 4: Configure Firewalld for HTTP and HTTPS
Add a firewall rule to allow permanent access for HTTP and HTTPS:
[root@web ~]# firewall-cmd --add-service=http --permanent
success
[root@web ~]# firewall-cmd --add-service=https --permanent
success
[root@web ~]#firewall-cmd --reload
Note: The above command enables access for HTTP only. By default, Apache listens on port 80 (HTTP) and port 443 (HTTPS). If you do not want to make the changes permanent, simply remove the
--permanentflag from the command and avoid usingfirewall-cmd --reload, as this will delete any non-permanent rules.
To list all information for the default firewall zone, you can use the following command:
firewall-cmd --info-zone=public
[root@web ~]# firewall-cmd --info-zone=public
public (active)
  target: default
  icmp-block-inversion: no
  interfaces: enp0s3
  sources:
  services: cockpit dhcpv6-client http https ssh
  ports:
  protocols:
  forward: no
  masquerade: no
  forward-ports:
  source-ports:
  icmp-blocks:
  rich rules:
[root@web ~]#
If you want to see the details for the default zone without specifying its name, you can first find out what the default zone is and then display its information:
1. Get the default zone:
firewall-cmd --get-default-zone
2. List information for the default zone:
firewall-cmd --info-zone=$(firewall-cmd --get-default-zone)
This will provide you with comprehensive information about the default firewall zone, including services, ports, and other configurations.
Step 5: (Optional) Install mod_ssl for HTTPS Access
To enable secure access to Apache over HTTPS, you can install the mod_ssl module. Use the following command to install it:
yum install mod_ssl -y
After the installation is complete, you can configure SSL settings in the Apache configuration files, typically located at /etc/httpd/conf.d/ssl.conf.
More About mod_ssl: An optional module for the Apache HTTP Server is mod ssl. With the aid of the Open Source SSL/TLS toolkit OpenSSL, it offers robust cryptography for the Apache v1.3 and v2 webserver through the Secure Sockets Layer and Transport Layer Security cryptographic protocols.
Step 6: Test the Default Apache Page in Browser and Terminal
To confirm that Apache is running correctly, follow these steps:
Enter your server’s IP address in the address bar using the HTTP protocol:
1. Using a Web Browser:
- Open your web browser.
- Enter your server’s IP address in the address bar using the HTTP protocol: i.e
http://<server_IP>

At this point, Apache is displaying a test page from the default configuration. For detailed configuration instructions, please refer to the following article. How to Install LAMP Stack on CentOS/RHEL 9: A Step-by-Step Guide
Step 7: Install and Configure MySQL or MariaDB Server
Rocky Linux includes both MySQL and MariaDB packages in the AppStream repository. You can choose either database server based on your preferences and application requirements. When you install LAMP stack on CentOS/RHEL 9, you have the flexibility to select your preferred database. While some distributions may not offer both options by default, you can always add the necessary repositories to install your chosen database.
[root@web ~]# yum list available | grep -Ei "mariadb-server|mysql-server"
mariadb-server.x86_64                3:10.3.35-1.module+el8.6.0+1005+cdf19c22        appstream
mysql-server.x86_64                  8.0.30-1.module+el8.6.0+1057+4d6a1721           appstream
For this demonstration, we will install the widely used MySQL server. Follow the steps below to install MySQL:
1. Run the following command to install MySQL server:
# yum install mysql-server mysql -y
You can check the installed packages by running the following command:
dnf list installed mysql mysql-server
[root@web ~]# dnf list installed mysql mysql-server

Installed Packages
mysql.x86_64                     8.0.30-1.module+el8.6.0+1057+4d6a1721         @appstream
mysql-server.x86_64              8.0.30-1.module+el8.6.0+1057+4d6a1721         @appstream
[root@web ~]#
Once installation completed start mysql and enable it to auto start at reboot and check the runnin status.
systemctl start mysqld
systemctl enable mysqld
systemctl status mysqld
# systemctl start mysqld

# systemctl enable mysqld

Created symlink /etc/systemd/system/multi-user.target.wants/mysqld.service → /usr/lib/systemd/system/mysqld.service.

# systemctl status mysqld

● mysqld.service - MySQL 8.0 database server
   Loaded: loaded (/usr/lib/systemd/system/mysqld.service; enabled; vendor preset: disabled)
   Active: active (running) since Mon 2023-04-03 07:01:10 EDT; 31s ago
 Main PID: 2718 (mysqld)
   Status: "Server is operational"
    Tasks: 39 (limit: 23504)
   Memory: 453.5M
   CGroup: /system.slice/mysqld.service
           └─2718 /usr/libexec/mysqld --basedir=/usr

[..........Output altered...............]
2. Secure MySQL or Mariadb Server.
It’s time to Install LAMP Stack on CentOS/RHEL 9 and secure MySQL. By securing MySQL after you install the LAMP stack on CentOS/RHEL 9, you can disable root logins from localhost, change the password for the MySQL root user, delete anonymous user accounts, remove test databases, and reload privileges. The command listed below can be used to carry out these security measures after you install LAMP Stack on CentOS/RHEL 9:
Note: You will be asked for your MySQL root password when you run the command below. Since you haven’t yet chosen a password, just press Enter.
Please be aware that your server’s root password should prevent any confusion regarding this. After doing so, you will then be given a number of questions. We have supplied the answers below for ease of use. We advise you to select “YES” for the following choices:
# mysql_secure_installation

3. Restart MySQL.
# systemctl restart mysqld
MySQL installation is completed now Lets move to next steps to install PHP.
Step 8: Installing PHP.
What is PHP ?
- A server-side programming language called PHP is used to create either static or dynamic webpages or online apps. PHP, which formerly stood for Personal Home Pages, is now known as Hypertext Pre-processor.
- Only servers with PHP installed can interpret PHP scripts.
- Only a web browser is needed on the client machines to view the PHP scripts.
- A PHP file has the “.php” suffix and contains PHP tags.
The PHP version totally depends on the type of application you are going to deploy. Before installing PHP, please check your application’s compatibility.
Let’s check which PHP version is currently available on the default repository.
dnf list available php
# dnf list available php
Last metadata expiration check: 0:47:58 ago on Mon 03 Apr 2023 06:57:37 AM EDT.
Available Packages
php.x86_64                           7.2.24-1.module+el8.4.0+413+c9202dda                           appstream
[root@web ~]
As indicated by the command output, PHP 7.2 is currently available in the default AppStream repository. However, you can install PHP 7.4 or 8.x, 9.x by enabling the Remi repository or the EPEL repository, or by upgrading your operating system.
To enable the Remi repository, use the following command:
For Rocky Linux 8:
sudo dnf install https://rpms.remirepo.net/enterprise/remi-release-8.rpm
For Rocky Linux 9:
sudo dnf install https://rpms.remirepo.net/enterprise/remi-release-9.rpm
After enabling the Remi repository, you can install the desired PHP version using:
sudo dnf module enable php:remi-<version>
Make sure to replace <version> with the specific version of PHP you wish to install.
For demonstration purposes, we will install the default available PHP version. Use the following command to install PHP:
dnf install php php-mysqlnd -y
Once PHP and its necessary modules have been installed, restart the Apache service so that PHP can start working by entering the following command.
systemctl restart httpd
Finally, completed the LAMP stack configuration successfully. Let’s examine the command-line versions of each component of the LAMP stack, including PHP, MySQL, and Apache.
Step 8.1: Check LAMP Stack Version via Command Line
Check Apache Version
httpd -v
Check MySQL Version
mysql -V
Check PHP Version
php -v
Below image show above commands results.

Step 8.2: View Full PHP Process List through Apache Web Server
Create the info.php file on the Apache Document Root using the following command from the root account, restart the httpd service, then point your browser to the http://server IP/info.php address to get a complete list of information about PHP from your browser.
# echo "<?php phpinfo(); ?>" > /var/www/html/info.php
## systemctl restart httpd
The web page for PHP information is exactly like the image below. From a PHP perspective, this page essentially provides information about server. This can help with troubleshooting and making sure the settings are applied properly.
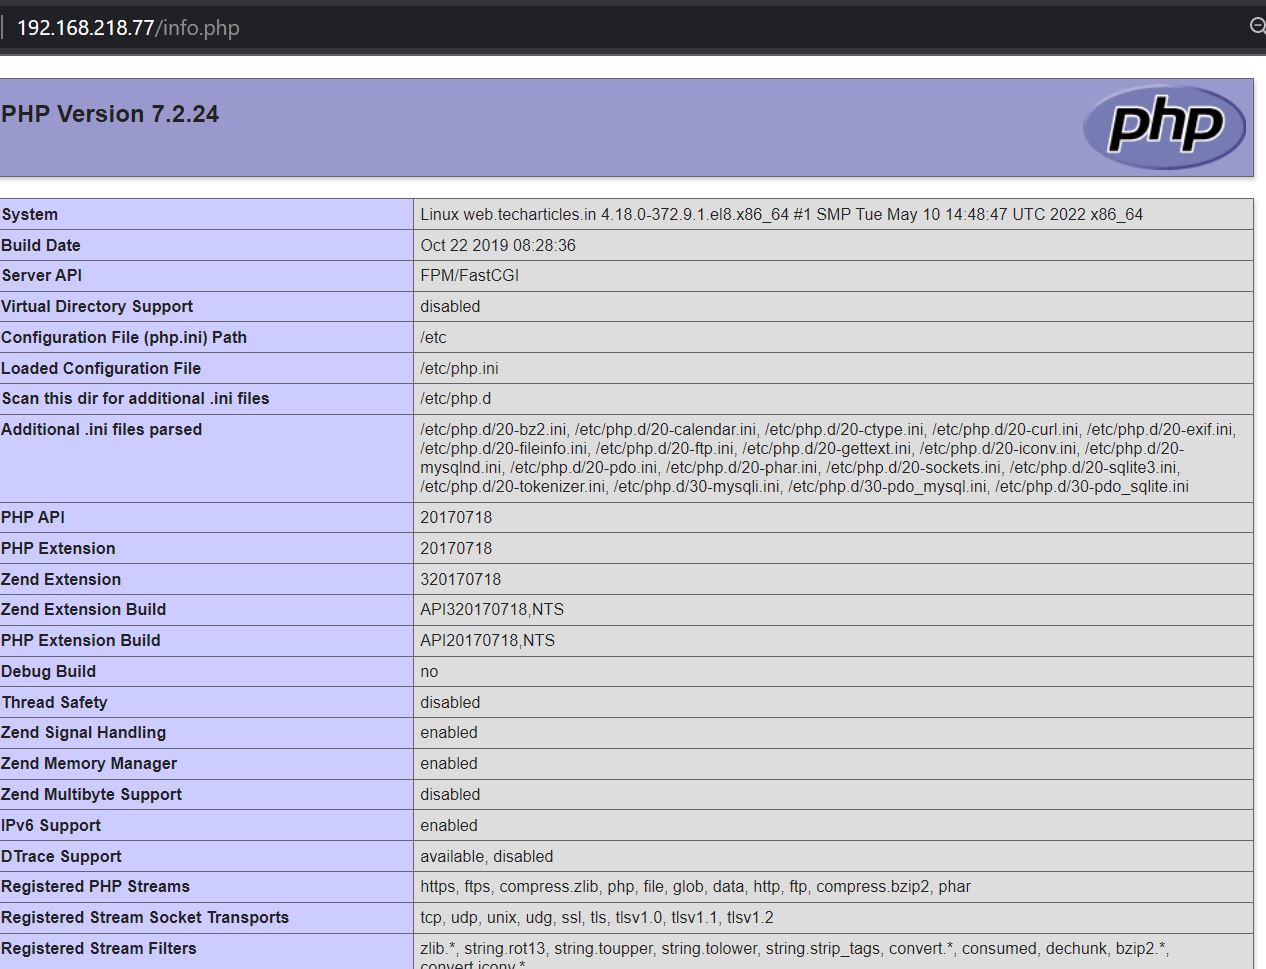
After this examination, it is advisable to delete this file because it should undoubtedly give information about your server to unauthorised users.
Conclusion
In conclusion, setting up and verifying a LAMP stack is essential for establishing a robust foundation for web development and hosting. When you install LAMP stack on CentOS/RHEL 9, you create a stable environment for running PHP applications by installing the default PHP version. Additionally, checking the LAMP stack version via the command line and viewing the PHP process list through the Apache web server allows you to confirm that your installation is functioning correctly and efficiently. This knowledge not only enhances your technical skills but also prepares you for more advanced configurations and optimizations in the future. Embracing these foundational steps is crucial for any developer looking to create dynamic web applications.
Please refer to the following article to install and configure PhpMyAdmin: To Install and configure phpMyAdmin in CentOS 8 / RHEL 8 Linux
.
===========================
Was this article of use to you? Post your insightful thoughts or recommendations in the comments section if you don’t find this article to be helpful or if you see any outdated information, a problem, or a typo to help this article better.
===========================


